Friday, January 26, 2024

EduXR - The XR Micro Learning Platform

Introducing our cutting-edge Augmented Reality (AR) educational application designed to revolutionize the learning experience for students across various courses and classes. This versatile app aligns seamlessly with official school curricula, offering an immersive journey through interactive experiments that bring abstract concepts to life.


Key Features:

Multi-Course Compatibility: Our AR application covers a spectrum of subjects, ensuring a comprehensive educational experience across diverse disciplines. From physics to biology, chemistry to mathematics, students can explore and understand each course with captivating augmented reality simulations.

Official Curriculum Integration: Aligned with official school curricula, the app ensures that students are learning in line with educational standards. The content is curated to enhance understanding and complement classroom teachings, providing a supplementary, interactive layer to the traditional learning process.

Multi-Year/Class Support: Tailored to cater to students of various levels, the app spans multiple years and classes. Whether you're a high school freshman or a senior, the AR experience evolves to meet the complexity and depth of the subjects studied, ensuring a continuous and progressive learning journey.

Multilingual Interface: Breaking down language barriers, our application supports multiple languages, making it accessible to a global audience. Students can learn and engage in their preferred language, fostering inclusivity and facilitating a more personalized learning experience.

Cross-Platform Compatibility: Our commitment to accessibility is reflected in the app's compatibility with multiple mobile platforms. Whether you use iOS or Android, our AR application is designed to function seamlessly on your device, bringing the wonders of augmented reality education to your fingertips.

Interactive Assessments: At the conclusion of each course or class, students can assess their understanding through interactive tests within the app. These assessments not only gauge knowledge retention but also provide instant feedback, including a percentage score. This feature empowers students to track their progress and reinforces the concepts learned in a dynamic and engaging manner.

Embark on an educational journey like never before with our AR application, where learning transcends traditional boundaries, and understanding is achieved through immersive experiences. 


Welcome to the future of education!


Wednesday, May 31, 2023

Micro API Design Pattern

 Hello there,

From the architectural/design point of view these are the common API design patterns:

  • monolith - all endpoints in one project (or dependencies)
  • micro services - separated by domain (and with specific components such as service registry or API gateway).

These have their own pros and cons and I would like to propose a hybrid approach - Micro APIs.

Technically, all micro APIs are hosted in a monolith but are not loaded as a normal dependencies - they are discovered at runtime. This approach is using the plugin-based design but applied to APIs. Basically, one can have all the benefits from the micro-services architectural/design pattern (as the micro APIs/plugins can be developed per domain and with different technologies, as long as the host can handle them) and still be manageable as a monolith (of course, this will not stop the host to be scaled and I think that sometimes a smart load balancer may redirect the traffic to the nodes that are domain specific, hence micro service).

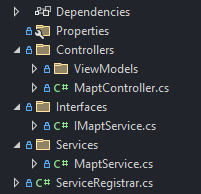
Each micro API will have it's own API endpoints handlers (e.g. controllers), services and data models (aka DTO, ViewModels, etc.). Using patterns like dependency injection each micro API can use services from the host, if needed (e.g. configuration, logging, etc.).

A micro API project might look like this:


An ASP.NET Core/6/7 implementation might look like this:

1/ At Startup.cs the host will try to discover the plugins from some location (this can be changed if needed).

RegisterPlugins(services);
private void RegisterPlugins(IServiceCollection serviceCollection)
{
    var pluginsPath = Path.Combine(AppContext.BaseDirectory@".\Plugins");
    string[] pluginPaths = Directory.GetFiles(pluginsPath"*.Plugin.dll"SearchOption.AllDirectories);
    var pluginAssemblies = pluginPaths.Select(pluginPath => pluginPath.LoadAssembly());
 
    foreach (var assembly in pluginAssemblies)
    {
        assembly.LoadBaseServices(serviceCollection);
        serviceCollection.AddAutoMapper(assembly);
 
        serviceCollection.AddControllers()
            .PartManager.ApplicationParts.Add(new AssemblyPart(assembly));
    }
 
    // init plugins
    var serviceProvider = serviceCollection.BuildServiceProvider();
    var registrars = serviceProvider.GetServices<IServiceRegistrar>();
 
    foreach (var registrar in registrars)
    {
        registrar.Register(serviceCollection);
    }
}

This will try to load all plugins and add the controllers as an application part.

2/ In order to use DI, a micro API would have to implement an IServiceRegistrar interface where all the DI services from that micro API will be registered in the services collection.

public interface IServiceRegistrar
{
    void Register(IServiceCollection services); 

}

public sealed class ServiceRegistrar : IServiceRegistrar
 {
     public void Register(IServiceCollection services)
     {
         services.AddScoped<IMaptServiceMaptService>();
     } 

 } 

3/ The micro API controllers will be the normal ASP.NET Core/6/7 controllers - no changes here.

[ApiController]
[Route("api/[controller]")]
[Authorize]
public class MaptController : ControllerBase
{
    readonly IMapper _mapper;
    readonly IMaptService _maptService;
 
    public MaptController(IMapper mapperIMaptService maptService)
    {
        _mapper = mapper;
        _maptService = maptService;
    }
 
    [HttpGet]
    public IActionResult Get()
    {
        return StatusCode(200new MaptViewModel { Result = "OK" });
    }
}

4/ If you now run the WebAPI host and enable Swagger (e.g. Swashbuckle.AspNetCore) you will notice that even if the micro API project is not statically linked/referred by the WebAPI host, the micro APIs endpoints will appear in the Swagger documentation and will be available to be consumed.

If an existing micro API is removed then the impact on the host is minimal or non-existing (the host is auto-cleaning). Same for adding a micro API, the host will load it in it's memory context and expose any endpoints of the micro API.

Hope this will help you in designing new ways of consuming APIs!

Happy Coding!


The helper functions (which can be part of a common project/assembly):

public class PluginLoadContext : AssemblyLoadContext
    {
        private AssemblyDependencyResolver _resolver;
 
        public PluginLoadContext(string pluginPath)
        {
            _resolver = new AssemblyDependencyResolver(pluginPath);
        }
 
        protected override Assembly Load(AssemblyName assemblyName)
        {
            string assemblyPath = _resolver.ResolveAssemblyToPath(assemblyName);
            if (assemblyPath != null)
            {
                return LoadFromAssemblyPath(assemblyPath);
            }
 
            return null;
        }
 
        protected override IntPtr LoadUnmanagedDll(string unmanagedDllName)
        {
            string libraryPath = _resolver.ResolveUnmanagedDllToPath(unmanagedDllName);
            if (libraryPath != null)
            {
                return LoadUnmanagedDllFromPath(libraryPath);
            }
 
            return IntPtr.Zero;
        }
    }


public static class PluginHelpers
{
    public static Assembly LoadAssembly(this string path)
    {
        string pluginLocation = Path.GetFullPath(path);
        return new PluginLoadContext(pluginLocation).LoadFromAssemblyName(AssemblyName.GetAssemblyName(pluginLocation));
    }
 
    public static void LoadBaseServices(this Assembly assemblyIServiceCollection services)
    {
        foreach (Type type in assembly.GetTypes())
        {
            if (typeof(ICommand).IsAssignableFrom(type))
            {
                services.AddSingleton(typeof(ICommand), type);
            }
            if (typeof(IServiceRegistrar).IsAssignableFrom(type))
            {
                services.AddSingleton(typeof(IServiceRegistrar), type);
            }
        }
    } } 

Wednesday, April 6, 2022

SteamVR Input in MRTK 2.6 and later

 Hello,

I've seen a lot of interest on this topic and I would like to put the info in one place.

First, you need to download SteamVR asset and use my implementation of SteamVR XRSDK Device Manager and controllers from here.

There are two parts: one is in SteamVR and one is in MRTK. 
If you already know the actions you need for SteamVR, then you need to generate the SteamVR_Input action classes (these are used by the custom implementation of the SteamVR layer in MRTK) by going to Unity Editor menu, Windows -> SteamVR Input and hit Generate. If you need to change the bindings, you will need to create the bindings in the bindings UI.


Then, you need to add the SteamVR XRSDK manager to data providers and use the Player prefab from SteamVR - this will give you the avatar hands (ofc, you can create a separate one with whatever hands you want but you will need to animate that).


Then you need to add SteamVRXRSDKControllers in the Controller Definitions area.


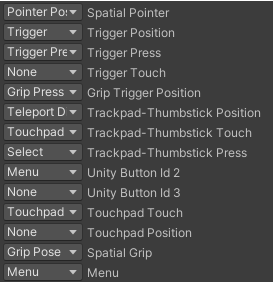
Then you need to alter input mappings for the Generic OpenVR Controller Definitions (if you plan to add specific actions - in my case I used Touchpad click as Select):


Then you need to Update mappings by going to Unity Editor and in the menu: Mixed Reality Toolkit -> Update -> Controller mappings profiles. This will update some assets from MRTK.

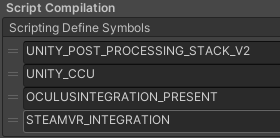
Then you need to activate the SteamVR for MRTK by adding the preprocessor directive STEAMVR_INTEGRATION in Unity Editor/Player/Other.


Finally, you need to activate the OpenVR Loader in XR Management.


If you hit Play in Editor, the app will start and you should see the MRTK default gizmo controllers synced with the SteamVR avatar hands.

That's about it!

Have fun!

Tuesday, November 30, 2021

Tuesday, July 23, 2019

ReplayVR - Support page

Hey there,

This is the page for ReplayVR asset. Checkout the ReplayVR-Demo project on Github: https://github.com/eusebiu/ReplayVR-Demo

Please add your comments or requests in the comments section or on the github issues page.

Thank you!

Tuesday, January 3, 2017

Upgrading Node.js and Npm on Raspberry Pi

Happy New Year!

This holiday I bought myself a Raspberry Pi (with a camera module) as I wanted to play with Node-RED on a real Internet-Of-Things device (the pi has Raspbian Jesse).

The default version of NodeJs on NOOBs is 0.12.x and some of the flows nodes do not work on this (e.g. node-red-contrib-python-function) since they might use ECMA6 syntax (e.g. lambda expression).
So, I had to upgrade the Node.js version to a newer version like 6.x.

After remo nodered, nodejs and npm I installed them back with the correct version (using sudo apt-get install nodejs npm nodered). Unfortunately, installing them this way do not install the node-red-start/stop commands. After a quick search online I found these commands:

sudo wget https://raw.githubusercontent.com/node-red/raspbian-deb-package/master/resources/nodered.service -O /lib/systemd/system/nodered.service
sudo wget https://raw.githubusercontent.com/node-red/raspbian-deb-package/master/resources/node-red-start -O /usr/bin/node-red-start
sudo wget https://raw.githubusercontent.com/node-red/raspbian-deb-package/master/resources/node-red-stop -O /usr/bin/node-red-stop
sudo chmod +x /usr/bin/node-red-st*
sudo systemctl daemon-reload

sudo systemctl enable nodered.service

These commands will install the node-red-start/stop commands and make it start when the device boots!

Pretty nice!

Happy coding!

Monday, May 23, 2016

Web Inspector CAB for Rho WM6.5


Download from here:
https://drive.google.com/folderview?id=0B_5lxJaDe7iiQVVHRzNpVDNMV2c&usp=sharing


Guide here:
http://ebzebra.github.io/docs/1.3/index.html#guide-debuggingjs?UsingRemoteDebugInspector

VS2008:
http://stackoverflow.com/questions/24510831/create-a-windows-mobile-6-5-3-project-in-visual-studio-2008
https://support.microsoft.com/en-us/kb/931937

Monday, June 1, 2015

IBM MobileFirst Platform Foundation (Worklight) - nodename nor servname provided or not known (some ip)

Hey there,

Due to Mac@IBM initiative, I've moved my primary workstation to 2014 MacBook Pro (15') with an OSX Yosemite 10.10.3.

Being a Mobile Architect in IBM Mobile Center of Competency, I also do a lot of work with IBM MobileFirst Platform Foundation (aka Worklight).
In one of my current projects (developed with IBM MFPF) I got the error in the title when building an iPad environment.
Looking in /etc/hosts and /private/etc/hosts the mappings were correct. The solution was to change the host name using the scutil command:
scutil --set HostName "localhost" 

Happy IMF coding! :)


Friday, December 12, 2014

Friday, November 28, 2014

Intel® RealSense™ AppChallenge - Phase 2 - Demo 1

Hello,

This week I got the Intel® RealSense™ Camera and I've started creating the Visual Studio extension for the Intel® RealSense™ AppChallange.

First, I've installed the Intel® RealSense™ SDK which has some very nice samples for both C++ and C#.
Then I've installed Visual Studio 2013 Community edition (Thank you Microsoft!) and then VS 2013 SDK.

All tools are now in place!

The Natural Interaction Visual Studio (2013) extension is designed to be initialized when a solution is loaded - here the devices are discovered and entities initialized (e.g. SpeechRecognition). Once this happens, the user can go to the menu TOOLS and then Options... to view the Natural Interaction extension settings. In my case, I used a small vocabulary file for the "Start debugging" and "Stop debugging" sentences.

After some hours of coding, I've come to the following (promising) result: http://screencast.com/t/uvvmbfBHXkrQ.

This is Demo 1 - more commands (like Step into, step out) will follow. Also, the gestures are to be expected in the near future... but that is for another post!

Have fun!

Monday, November 24, 2014

Intel® RealSense™ AppChallenge - Phase 2

Hello,

Last week I was nominated as a Phase 2 finalist for Intel® RealSense™ AppChallenge to develop a Natural Interaction Visual Studio extension.
This week I will get the Dev kit that contains the Intel® RealSense™ 3D camera and I will start developing the VS extension.

I'll post here how the project gos!

Stay tuned!

Tuesday, October 15, 2013

AccessViolationException: Attempted to read or write protected memory - COM libraries

Hello,

In one of my project I have a .NET library that is registered to COM in order to be used from a C++ library.
Due to some error, I had to change the interface of an type; I added a new property ID and I set the type of this ID property to be int.
Once testing was done, I deployed the library in production and I started to see the following error:
Unhandled Exception: System.AccessViolationException: Attempted to read or write protected memory. T
his is often an indication that other memory is corrupt.
   at System.String.wstrcpy(Char* dmem, Char* smem, Int32 charCount)
   at System.String.CtorCharPtrStartLength(Char* ptr, Int32 startIndex, Int32 length)
   at System.StubHelpers.BSTRMarshaler.ConvertToManaged(IntPtr bstr)
...

The source of this error was pretty obvious (since the modification I stated earlier was the only one).
I remembered that the type in which I've added the new property ID is mapped to an Entity Framework type (using AutoMapper) and in this entity the ID was of type decimal. After changing the type from int to decimal, the AccessViolationException was gone...

:|

Sunday, October 13, 2013

Programming languages guide (on Apple AppStore)

My second app was approved on Apple AppStore.
You can find it here.

For support and questions, please comment here!

Friday, September 13, 2013

Technical Dictionary En-Ro App (on Apple AppStore)

Hello,

One of my apps was just approved and you can find it here.

For any questions or issues, please comment here!

Thanks!

Tuesday, September 3, 2013

Create/distribute iOS apps (Cordova/PhoneGap)

Hello,

A while ago I've started creating some mobile apps. Since native development (Java/Objective-C) can take some time, I decided to learn an HTML5 mobile framework. One of the most popular (and free/OSS) frameworks is Apache Cordova. You can learn a lot about Cordova on the web...

Since I've wanted to publish some apps, I've also had to became an Apple Developer, buying an Apple Developer ID/Subscription for iOS apps. After that I was able to connect to Member Center and iTunes Connect to configure my account.

Back to the technical part... Once I finished testing the app on the simulators, I had to create an archive of distribution. The first problem I encountered was CopyPNG error. Since I've created the images on Windows, the build process was unable to copy the png images. In order to fix this I had to open the png images in the Preview app and Export them to png and override the images.
After all images errors were fixed, I got another error during linking because libCordova.a was not found (this is actually a bug in the PhoneGap project template). The solution here was to properly set the path to libCordova.a:
- Go to project settings and Build Tab. Search for "Other Linker Flags"
- Double click on the linker flags for Release and Change ${TARGET_BUILD_DIR}/libCordova.a to ${BUILT_PRODUCTS_DIR}/libCordova.a.
Do a clean... build... and an Archive.

Now I am able to test the app on the device and publish it!

Happy coding!

P.S. I also had some problems when I've entered my banking account information... In Romania it's enough to have only the IBAN + name but iTunesConnect wanted the bank account number (which I thought it's the same as the IBAN). After some trials and errors (and a lot of google searching) I came with nothing - the iTunes Connect kept saying that the bank account number is 16 characters long and it's verified against the IBAN; I tried various configurations and none worked... Around 2 AM I decided to go to sleep and go to the bank next day and ask them about my bank account number. But in my way to the bed, I thought that if I remove the first 8 characters (which identifies the country and the bank) I'd get something that something that must identify me. The next day I tried my last idea and it worked. So it looks like the bank account number are the last 16 characters in the IBAN.(at least this works in Romania)

Thursday, March 21, 2013

Freeze/persist ASP.NET GridView header (with images)

Hello,

From time to time we all get a nasty task like 'freeze the grid header and if it is possible do it for most browsers'.
In my case the grid was and ASP.NET WebForms GridView. There are many solutions online (jQuery plugins of some CSS stuff) regarding this but in my case none of those worked by default. What was different in my case was the header; the header cells were some images generated by some aspx file.
The default behavior of the solutions I found was that the header was not in sync with the text cells. This happens because the images were not loaded when the table element (the gridview) was generated.
These are the steps that worked for me:
1. Set the GridView to have thead as header and tbody as body. In RowDataBound set the GridView.HeaderRow.TableSection = TableRowSection.TableHeader;
2. Use the idea from here: http://css-tricks.com/snippets/jquery/persistant-headers-on-tables/
3. Modify a little bit the code to wait for loading images and then modify the width of the th elements:

    window.onload = function () {
        $("table.tableWithFloatingHeader").each(function () {
            $(this).wrap("
");
            $("tr:first", this).before($("tr:first", this).clone());
            clonedHeaderRow = $("tr:first", this);
            clonedHeaderRow.addClass("tableFloatingHeader");
            clonedHeaderRow.css("position", "absolute");
            clonedHeaderRow.css("top", "0px");
            clonedHeaderRow.css("left", "0px");
            clonedHeaderRow.css("visibility", "hidden");

            var row_ths = $("tr:nth-child(2)", this).children("th");
            var crow_ths = $("tr:nth-child(1)", this).children("th"); ;

            for (var i = 0; i < row_ths.size(); ++i) {
                crow_ths.eq(i).width(row_ths.eq(i).width() + 2);
            }
        });

That's about it!